Adding Features To VirtualBox By Installing Guest Additions
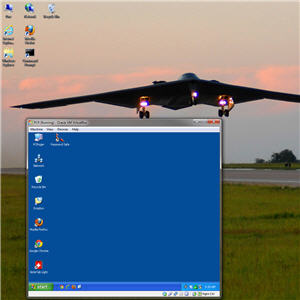
I did a video on how to add VirtualBox Guest Additions because I knew from personal experience that the tutorials I found for this online always seemed to lack something in the step-by-step; such as WHERE to find the actual Guest Additions software!
So after finally deciding that I could be more effective if I used Oracle VirtualBox more, I determined that the reason I did NOT use it more was primarily the hassle of not being able to copy and paste from my host Windows 7 system to the guest Windows XP VirtualBox.
Adding Guest Additions to VirtualBox virtual machines (you have to add it to each one you have configured) gives you that copy and paste functionality.
Another helpful improvement from adding Guest Additions to VirtualBox is the seemless mouse travel. Without Guest Additions you have to “click into” the VM and then press a hot-key, like the right control key, to get out.
Where To Find The Guest Additions Software
It turns out that the Guest Additions software comes in the form of a CD ISO file that is installed on your computer when you install VirtualBox – who’da thunk? In all of my digging (some months ago, it may have changed by now) that information seemed to be “assumed” and never spelled out.
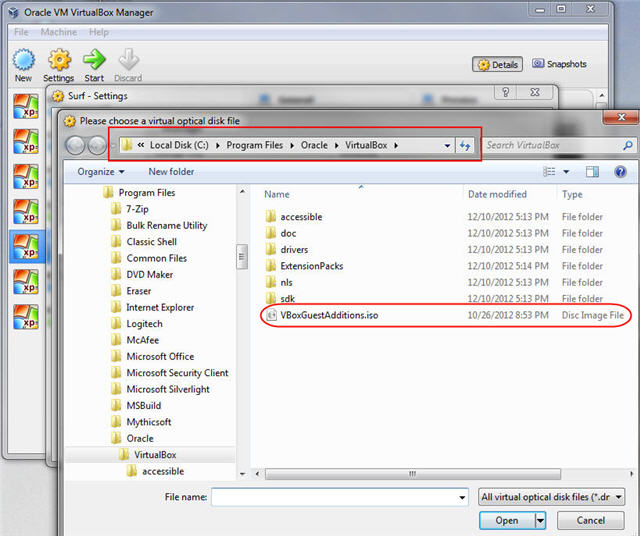
The file is VBoxGuestAdditions.iso and, on my Windows 7 64 bit PC, was in the directory C:\Program Files\Oracle\VirtualBox
The procedure for how to add Virtual Box Guest Additions I have outlined below:
- Open Oracle VM VirtualBox Manager
- Select the VM that you want to add Guest Additions to
- Click on the “Settings” “Gear Wheel” in the menu bar
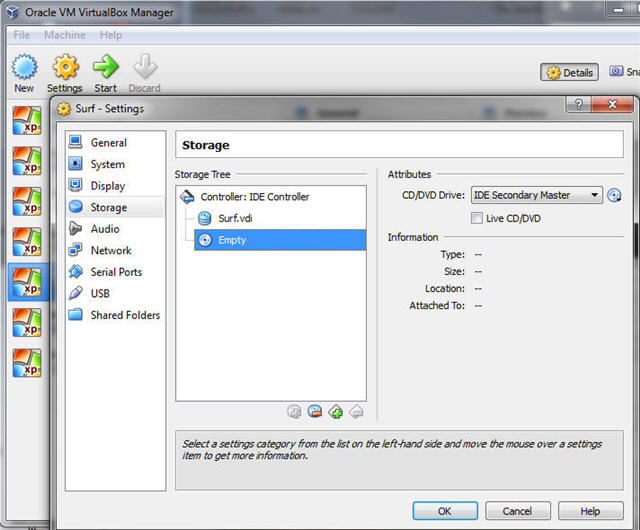
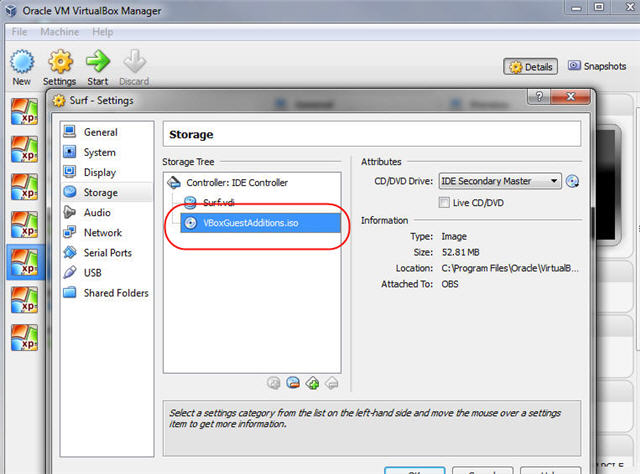
- Click on the “Storage” section in the left pane (see screenshot 1 below)
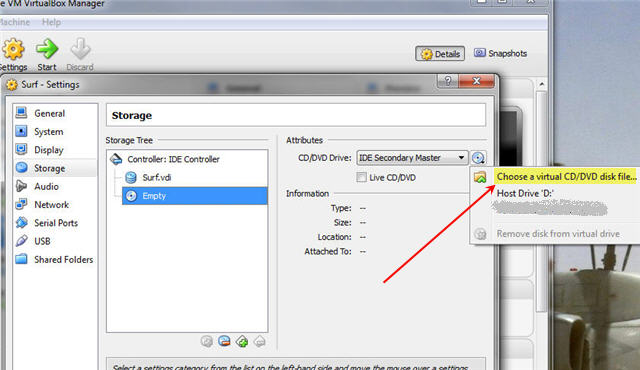
- Select the CD/DVD drive (if not present, the video shows how to add) (see screenshot 2)
- “Load” the VBoxGuestAdditions.iso file in the virtual CD drive (see screenshot 3)
- Confirm that ISO is loaded and click “Ok” (see screenshot 4)
- Start Virtual Machine
- Open “My Computer” and find the Guest Additions “CD” in the D: drive
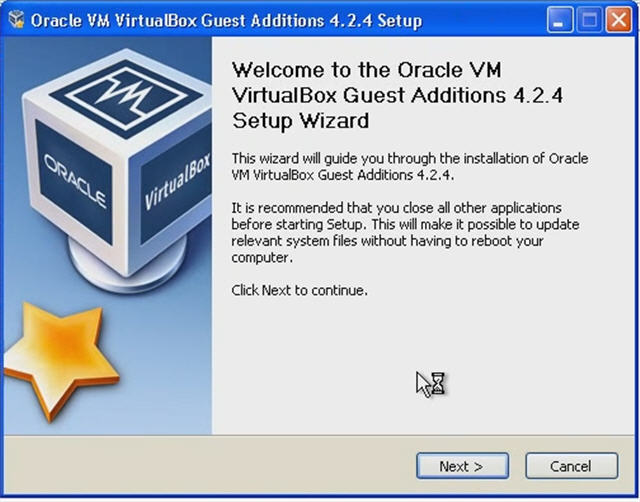
- Double click CD drive which should AutoRun the Guest Additions (see screenshot 5)
- Shutdown VirtualBox machine
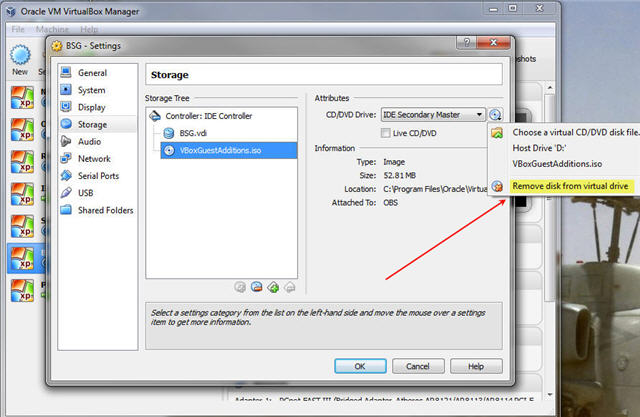
- Edit settings again, in “Storage”, and remove the ISO “disk” from virtual CD drive (see screenshot 6)
- Check for the settings you want in “General” section, “Advanced” tab
and in the following video for those of you who prefer that:
How To Add VirtualBox Guest Additions video on YouTube
Here are the screenshots referenced above for how to add VirtualBox Guest Additions
This is great, especially for a luddite like me. You’re so right about little steps being left out because others assumed you’d know them. This is detailed and yet simply explained and much appreciated.
I have read about Virtualisation but never got round to implementing. This makes it so much easier.
Is Virtualbox a free application?
Yes it is, Dave. It’s free and, to me, much easier for BASIC VM usage than VMWare.
Thanks for posting.
So I am still a newbie to these type of things. In fact, I don’t really know what a Virtualbox can do for me. If you would be so kind to enlighten the folks out here that are clueless.
Virtual machines (VMWare, VirtualBox) let you run a “computer inside a computer”. I have a Windows 7 workstation that I can run 3 or 4 VirtualBox machines of Windows XP inside of and they are just another “window” on my 2 large Dell 24″ monitors.
The benefit is that I can have one dedicated to this site, PCRoger.com, another to FreeComputerConsultant.com, etc. Each have their own logins at Google, YouTube, and various social media sites. That way they can all stay logged in and correct. I use different color desktop backgrounds so I know at a glance which I am working in and try not to confuse them!
Virtual Machines are also a great way to isolate activity. For clients I would setup a very restrictive VirtualBox for online banking. Their firewall would then allow those VM’s to ONLY access a few specific, secure sites on the internet.
Hope that helps.
It does a great deal, because I am in the process of having multiple Gmail accounts associated with various sites, so I thank you for the great explanation and useful tips. Thanks Roger.
I’m with Pat on this one. I’m clueless. I had to look up ‘luddite’ to realize I was one of ’em!
Great tutorial Roger, that’s a cool idea to keep separate accounts on different VM’s. My concern would be the processing power to keep a few VM’s running and the lag time between applications. My machine is not that powerful and I would not want to effect productivity with delays.
Mark,
My machine is several years old, but it is quad core with 8GB RAM on Windows 7 64bit (the 64bit is required to get benefit from the memory above 4GB). Each VM can be configured for how much ram you allocate, etc. Get lots of tabs going and Firefox does start to stall a bit. Overall, quite a productivity enhancement for me.
Roger
Roger what a great tutorial and the explanation was so helpful. I now know what a Virtual Box is. 🙂
Will I use it, can’t really say right now…but you never know. Great article! 🙂
Thank you so much!! Incredibly helpful!
Hi Roger,
Thanks for your detailed explenation in this, and what a cool name:)
Could you please inform how to get the shared folder to work, by the way after the above i am still unable to drag and drop files from local pc to VM …
Looking forward in your reply.
Thanks..
Roger
I’m not sure drag & drop has ever worked with Windows.
I create a shared folder on the desktop of the host Windows PC and that seems to work fine.
Best,
Roger
Thanks much for that.
Excelente si funciona! Gracias.