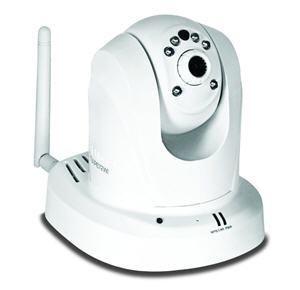
Affordable TrendNet Megapixel Wireless TV-IP672WI PTZ Night Vision Camera

Ever since buying my first TrendNet Day/Night internet camera I have had really no desire to plunk down money for a security camera without night vision.
My first PTZ camera was an Axis 215 that is still deployed, and works well remotely as long as I reboot it once per week, instructions here. It’s a really cool camera that came with a very high price tag – over $1000.
And while it does have some anti tamper features it does not have WiFi, does not have night vision so we have to leave a CFL light on in the building and has given us reliability problems besides.
So when I decided I wanted another PTZ internet camera I chose the TrendNet Megapixel Wireless TV-IP672WI PTZ Night Vision Camera shown at left.
Following the typical internet camera shopping experience at Amazon, you can simply click buttons to add or remove features and move along the “family” of base camera models and adjust the price accordingly.
The thing I don’t want, though, is to have a camera that is short the feature I need. That’s why even though I intent to hardwire my cameras, I spend a little more to have the wireless feature so that in a temporary situation I can connect it up to WiFi, often mounted on a small wooden base to set on a floor or table.
What’s Included With The TrendNet TV-IP672WI
The camera comes with pretty much all you will need to get going, but I thought a “box opening” video might be helpful to some of you, so here it is:
Get this TRENDnet PTZ Internet Camera at Amazon
DO THIS FIRST Once You Buy A Security Camera
Once you buy your security camera your first inclination is to rip it out of the box, get it configured and see that first image.
STOP!
For whatever reason, TRENDnet (and many other manufacturers), recommend resetting to factory defaults after upgrading firmware and NOT restoring a saved configuration file (so…what good is the file?).
Save yourself some grief and follow these steps:
- Buy the camera
- Take it out of box
- Hook up to power (through a surge protector or UPS)
- Connect to network with a CABLE (You don’t want the connection to flake during firmware upgrade)
- Download the latest firmware (TV-IP672WI firmware here)
- Unzip the firmware file
- Login to the camera, Setup | Tools | Firmware upgrade
- Camera will reboot
- Login to camera
- Setup | Tools | Reset to factory defaults
- Change the admin password!
- Configure for your application
- OK, Save the configuration to a file, just in case it’s of use (under Tools | System)
How to Upgrade Firmware On Your TRENDnet Internet Camera – Video
To help with the steps above, here is a short video I did to walk you through the firmware upgrade process on the TRENDnet TV-IP672WI:
great video, could you please tell me how to record to sd card with Trendnet 672 IP camera. Thank you Fred